Start with the controls
Choose a difficulty in the game, then left-click a covered square to reveal it. Right-click to place or remove a flag. A mouse is the clearest way to learn this version because revealing and flagging use separate buttons.
The objective is to reveal every square that does not contain a mine. Opening a mine ends the attempt. You do not need to guess where every mine is before opening any safe squares.
Read all eight neighbors
A revealed number counts mines in the squares touching it, including diagonals. A central square can have eight neighbors; edge and corner squares have fewer. A 1 means exactly one mine exists among its neighbors, not necessarily immediately above or below it.
Start with numbers next to already revealed areas. They have fewer unknown neighbors, which makes their information more useful.
Use two deduction rules
Rule 1: all remaining covered neighbors are mines
If a 1 has only one covered neighbor, that neighbor must be a mine. More generally, subtract the mines you have already correctly identified from the number. If the result equals the number of remaining unknown neighbors, all of those unknown squares contain mines.
Rule 2: the remaining neighbors are safe
If you have already correctly identified every mine touching a number, its other covered neighbors are safe. For example, a 2 touching two proven mines needs no additional mine among its other neighbors.
Both rules depend on earlier deductions being correct. A misplaced flag can make a dangerous square appear safe.
Compare overlapping clues
Sometimes two numbers describe overlapping groups. Suppose one clue proves there is exactly one mine among squares A and B. A second clue proves there is exactly one mine among A, B and C. Since the mine required by the second clue is already accounted for within A and B, C is safe.
Use this reasoning only when you have accounted for every neighbor of each clue, including any known mines. A familiar-looking pattern is not enough if its surrounding squares differ.
Recognize uncertainty
Not every board position offers an obvious forced move. Check another part of the board before guessing. If you do guess, recognize that a loss does not necessarily mean your deduction was wrong.
During practice, value a correct explanation over a fast timer. When you lose after following a flag, work backward to the clue that justified that flag. Increase the board size once you can apply the two basic rules consistently.
A recorded play session: what happened
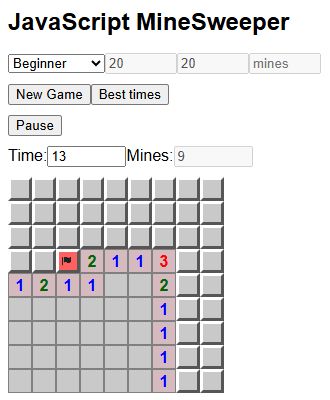
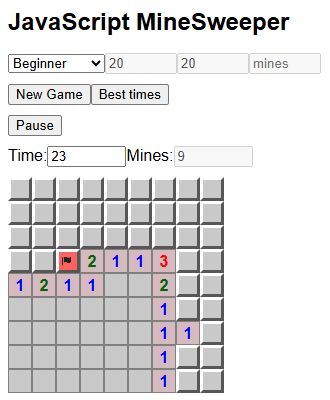
On a Beginner board, overlapping clues identified a mine in row 4, column 3 and a safe square in row 7, column 8.
Count rows from the top and columns from the left, starting at 1. In the screenshots, the 1 at row 5, column 1 has two covered neighbors directly above it. The adjacent 2 at row 5, column 2 shares those two neighbors and adds the covered square at row 4, column 3. That extra square must contain the second mine, so we flagged it.
For the safe move, compare the 1 at row 8, column 7 with the 1 immediately below it. Both need one mine among the covered squares in column 8, but the upper clue includes one additional square: row 7, column 8. Since the lower pair already accounts for the mine, that additional square is safe. Opening it revealed a 1.
Try it: compare complete neighbor sets before copying a pattern. The same-looking numbers can mean something different when a diagonal square is still unknown. A right-click changed the flag counter; that counter records your markers, not proof that every marker is correct.
Try the next run
Use one idea from this guide in the Minesweeper player. Its game page includes controls and edition/source details.